Friday, 20 March 2015

A low volume king size quilt

Charlotte asked for a king size quilt in soft pale colours and it has taken many weeks to make. I laid it all out on the floor many times, stuck labels on all the bits and lost my way several times with it when the labels fell off! But at last it is finished and on her bed. I hope it will be her happy memory quilt, with her wedding day dress, William's shirt, little daughter Juliet's dress and Bertie's sun hat all there to make a family story.

This is how it started with Post and Rail blocks....


Post and Rail blocks by Green Star Quilts
Then it grew......

Post and Rail blocks by Green Star Quilts
I made the quilt in quarters so it was easier to handle but even so there was A Lot Of Quilt!! Can you see my labels, row 1, row 2, row 3......

More Post and Rail blocks
Finally the four pieces were finished and I quilted them with a grid pattern up to an inch from the centre joining edges. It was a bit of a wrestling match to get it all through the machine! Then I joined the top edges together, cut the wadding to size and ladder stitched it , then the backing fabric edges were folded over and hand stitched down and the quilting completed.Wrapped up in this quilt whilst I was stitching it all was so cosy... The backing fabric is white with a pale yellow stripe.

backing fabric
flower on the back made from Bertie's sun hat

Here it is at last on the bed and I am making these big photos for a really huge quilt!

Post and Rail low volume King size quilt by Green Star Quilts

And just to show that it goes right down to the floor too....

Post and Rail low volume quilt by Green Star Quilts


I must say that if I ever make another quilt this size it would be sensible to have it longarm quilted. I have learnt a lot making such a big quilt, such as realising that my Bernina walking foot wouldn't hold the stitch guide thingy until Husband ( now with a capital letter as he is so handy) modified it by cutting up an old electrical plug and saving me £40!

This  sunny morning we have watched the partial eclispe of the sun with our pinhole camera made from a shoe box. We sat in the garden as it got a bit dark and birds became quiet. It wasn't dark enough to wake the owl up though, just rather grey and strange. We both said we felt rather small as our earth lost it's brightness. As the sun returned we looked with gratitude at the garden and felt glad that signs of spring were all around.

Tete a tete daffodils
The colours in the garden are low volume like Charlotte's quilt but I am so grateful to see them arrive after the winter.

May blossom
I have looked out of the window many times over the morning now and felt so glad for the sunshine today. There is a whisper of change, and lots of hope for the summer to come.....


The next quilt on the list is a dinosaur themed one, there's nothing like a change!

I hope you have a lovely week quilting,
Kind regards,
Sue

PS. Here is one of the finished seaside quilts.... 


Seaside quilt by Green Star Quilts


Thursday, 26 February 2015

A sea, sun and sand quilt


kite flying on the beach by Green Star Quilts

Here in Lincolnshire we have the most wonderful safe and sandy beaches and in the summer they make a great place to visit with children. Our seaside towns are very traditional, lots of shops selling buckets and spades, whirly windmills in bright colours and every sort of ice cream possible. The donkey rides are a huge attraction and because the landscape is flat, the sun seems so high in our big skies. Fish and chips for lunch, a walk along the seafront, lots of dogs swimming in the sea and such enormous happiness from burying your feet in the sand..... it all makes a very special day out.


children on the beach

 So even though the weather is still chilly and the snowdrops are only just out, I have been making a seaside inspired quilt. Here is the first block:


star block for seaside quilt
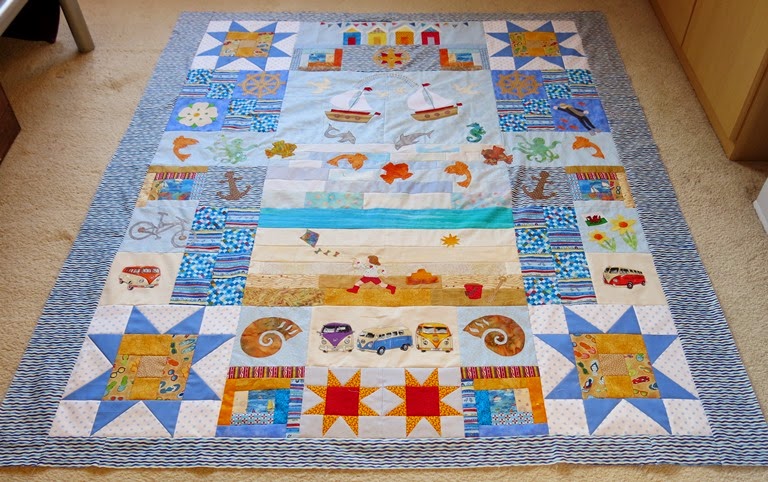
It is a picture quilt with lots to look at and retro camper vans for the trip to the beach.... I fussy cut the campers from a printed fabric:

camper vans at the beach
The shell were inspired by these I saw in a shop window:

Amonites in a shop window
The colours of the quilt are bright and sunny, using lots of different fabrics from all the tiny pieces saved in the sewing room. I save every tiny scrap with Bondaweb on it from other projects and they are so useful for things like tiny strings of bunting....

beach huts by Green Star Quilts

The local people on the coast are very friendly and make every effort welcome people and their dogs...


The quilt top is nearly finished now and ready to be quilted:

Seaside quilt top by Green Star Quilts

Boats, fish, swimmers, bikes are there and daffodils, a Welsh flag and The White Rose of York to show the family history of Emily who will own this quilt soon. I am just about to quilt the top now and will show you the finished quilt next time.


So in this pale spring sunshine, I hope you have felt a little warmer for a few minutes reading the blog,
Happy quilting this week,
Kind regards,
Sue

PS. I so enjoy reading your comments, they make a happy part of my day, so thank you for saying hello, I will answer them all on the comments bit and visit your blogs if possible too.

Thursday, 12 February 2015

Peaches and cream fabrics for a cot quilt


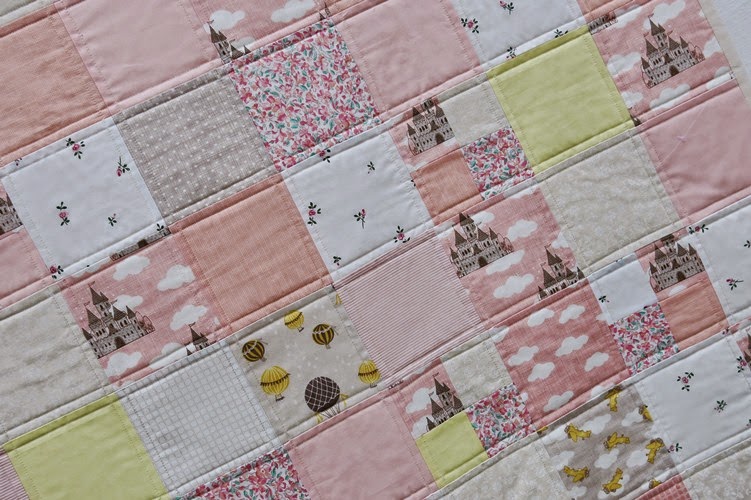
Amy is expecting her second baby in May. She is decorating the nursery in peach, white and cream colours and has asked me to make her a matching cot quilt. We have found some Moda fabrics called Storyline, these designs are so sweet, castles, balloons, stars and tiny birds, all in peach, pale yellow and turquoise colours. We have decided to use the taupe, peach and yellow colours ways and add some extra plain fabrics too. 

Storybook fabrics by Moda
I bought a charm pack from The Cotton Patch so we would have lots of choice with the patterns in the range. We trialed some other fabrics and Amy decided which ones she would like..... 

peach fabrics
I decided to divide some of the squares into four to add interest with the smaller squares. Here is the finished quilt:

Cot quilt by Green Star Quilts
This quilt measures 106 x 118cm ( 41.5 x 46.5 inches)


I took the quilt up to our nursery here for the extra photos..... we are expecting another baby in our own family soon too and I am so excited! Being a granny is the best job! Our antique wicker cot has been waiting so long for another baby to fill it.... No pressure though daughters....!

peach coloured quilt in antique wicker cot
Our house is early Victorian and just right for these photo shoots which are one of my favourite bits of blogging and taking photos.... I renovated every inch of that fireplace myself!
peach quilt with wicker cot
The back of the quilt and the binding is the softest American unbleached calico.

wicker cot with sheepskin and cot quilt

The Aconites are out in the garden, the birds are getting really interested in the nest boxes, new babies there too soon, it feels as though spring is just around the corner. 

Husband has felt the need to turn the compose heap, a sure sign that Things Are Starting in the gardening calendar. This is my signal that large amounts of Gardener's Cake is required too! 

Lots of you still have snow so armchairs and seed catalogues call, but I hope you have lots of time for quilting this week,
 Kind regards,
Sue


Friday, 6 February 2015

A memory quilt for Sarah

Sarah has been storing baby clothes for a long time. Her boys are big boys now, a long way on from babyhood and yet still the little clothes are in the bag, too precious to give away.... But recently she asked me to make them into a quilt, just for her. So many memories, happy, sad, tough times, wonderful times, laughter and tears, they are all in that bag. So here is the block I chose, a simple one as lots of the fabrics are t shirt materal:


simple block for a memory quilt
The quilt grew really quickly and soon the blocks were all made. I trialed blue for the sashing strips , these helped to keep the blocks a stable shape...

memory quilt blocks all laid out
Here is the finshed quilt which measures 54 x 69 inches:
Memory quilt by Green Star Quilts

In the corners are appliques of favourite toys, Bunny and Teddy, both much loved. As I took this photo, a pale wintery sun sent a ray across the quilt. There is snow here and it is so cold, so I left this photo with it's sunshine rather than waiting for a more matt photo finish, as it cheered me up.

On the quilt label, Sarah has chosen to add a quotation from Dr Suess:

'Sometimes you will never know the value of a moment, until it becomes a memory'

And that's what memory quilts are for really.


detail from a memory quilt
Now, this week I also need some advice from you. This quilt is quite heavy and I have developed a really achy shoulder and neck. It has been coming on for some time and of course I ignored it as you do! Now I am wondering if I should change my work table. It is an old kitchen one so my machine is quite high up. That's good if you want your nose near the stitching for applique, but not so good for the shoulders when quilting, which feel as though they are near my ears most of the day!

The quilting table
Do any of you use a Sewezi Table? Are they worth the cost? Do you have any good tips for sore shoulders? I have four big quilts to make over the next two months, so please help with advice,

Just going off to do some shoulder exercises now, drink coffee and eat a comforting choccy biscuit ( or three) with more aspirin,

Kind regards,
Sue


Friday, 23 January 2015

Spring chicks and a hyacinth inspired quilt


Hello and thanks for dropping in to see what I have been making this week. So far I have finished the hen and chicks baby quilt and here it is, a crib size measuring 93 x 80 cm and 36 1/2 x 31 1/2 inches. Just right to tuck around a new baby in the buggy or car, or to use as a play mat. Some of my customers hang this size quilt on the wall too. 


Hen and Chicks quilt by Green Star Quilts
Just to finish last weeks tutorial, I have quilted around the shapes very close to the edges and then free motion quilted with a wandering stitch over the white areas of the quilt.

And just a few ta dah moments.....


detail from Hens and Chicks quilt by Green Star Quilts
I love the egg yolk yellow of the chicks against the blues of the other squares... 

backing fabric for Hens and Chicks quilt by Green Star Quilts
The backing fabric is a turquoise blue with white polka dots. I use a lot of spotty fabrics as I like the retro look they give....


 Hens and Chicks quilt by Green Star Quilts
and it gave me a chance to look in our box of vintage Britton's farmyard animals to find the right livestock for the last photo...I do so love this bit, finding the right thing to add to the photo....

Hen and Chicks quilt with Britton's farmyard livestock
Does it make you think of Easter somehow? Hummmm chocolate eggs, now there's a welcome thought! 

Also this week my indoor hyacinths are in full flower. I would love to tell you that I am super organised, planted the bulbs before Christmas, kept them cool in the basement and brought them out when they started to flower.... I would love to, but being super unorganised ( and honest), I missed that bit out completely, went to the market, bought two pots, planted them into a bowl with extra compost and hid the plant labels! 

But the colour of hyacinth blue is so special and I have so many scraps in the sewing room, so I have started a hyacinth blues and greens quilt which will be a wall hanging for my kitchen. 

Here is the block... The white stars remind me of snowdrops with pointed petals...

Hyacinth quilt block by Green Star Quilts
This is the quilt so far... can you see that I have broken some random squares into smaller ones to add interest...


I'm not sure how big it will be in the end but I have enjoyed using 3 inch squares of my favourite scraps and the pile is getting smaller amazingly. It is a bit of a jigsaw puzzle on the back to get all those seams to butt up together without gaps... well there are a few I have found...

Hyacinth quilt top
Here are some of the fabrics used:

Hyacinth blues and greens in 3 inch squares
I wish I could say that no hyacinths have been harmed in the taking of this last photo, but yes, the right hand one did fall off and the stem broke, the other two flopped over in sympathy and look a bit sad.... oh well, off to the market again to buy the next two pots...

Hyacinth flowers and quilt top
It is freezing here in Lincoln today, no snow, but foggy and so very cold and I can't wait for the real spring to come. I will show you the (hopefully) finished quilt next week and also tell you about the monster king sized one which I am making over the next month. 

Happy sewing to you all this week,
Kind regards,
Sue


Friday, 16 January 2015

Bondaweb your chicken and quilt it


Here is the tuorial about how to use Bondaweb which is a fabric glue on a dissolvable web with a paper backing. There are other makes of a similar product, but this is the one I find easiest to use.

First draw your hen and chicks, just a simple shape is best to start with. Look in children's books, birthday cards, magazines for shapes and inspiration...

Pattern for hen and chicks by Green Star Quilts

Put your bondweb sheet over your pattern with it's paper backing uppermost. The glue side feels bumpy, the paper side feels smooth. Remember that your finished fabric shape will be the mirror image of your drawing, so turn it over if you want the hen facing the other way. Trace  round all the pieces of your pattern through the Bondaweb with a pencil.

Bondaweb tracing


Bondaweb shapes drawn out

Carefully cut around the shapes leaving a tiny margin at the edges. Handle the Bondaweb gently to stop the backing peeling off. Place your Bondaweb shapes bumpy (glue) side down on the back of your fabric. Iron carefully with a hot iron, no steam, and protect your iron by using baking parchment over the shapes just in case you have put one down glue side upwards, in which case it will stick to your iron.... trust me, I have done this loads of times!

Bondaweb shapes ironed onto fabric
Allow to cool down from the iron's heat, then cut your shapes out with sharp scissors on the pencil line.
Fabric shapes with Bondaweb backs

Peel the backing paper off the back of the shapes


paper backing is peeled off the shape

Now you are ready to place your shapes on the main fabric of the quilt, positioning them where you would like them to be on the finished quilt top.

Fabric shapes ironed onto quilt top
Iron them down carefully, using the baking parchment between your iron and the fabric. This helps to stop the pieces moving and protects your iron. Add the hen and chicks wings by repeating the ironing method.
Now your pieces are ready to be stitched down. I use free motion stitching but if you are not confident you can use a straight stitch slowly on these simple shapes.
When your hen and chicks are stitched down, you need to add some legs...

Chick with legs by Green Star Quilts

Now you are ready to layer up the quilt top with the wadding and backing fabric and quilt the whole top. 

I will show you the finished quilt in the next post. Have you been able to follow this tutorial ? I don't write many and hope I haven't missed out anything! If you are still bemused by Bondaweb and your pieces are stuck to the iron, do leave a comment and I will answer on the comments page...

I hope this is all helpful, I love this method and use it on most of my quilts,
Happy stitching this week,
Kind regards,
Sue